Showing posts with label Side Dish. Show all posts

Thursday, September 20, 2012

Oven Baked Sweet Potato Fries

 
I consider myself being very fortunate that my kids love fruits and vegetables.  I don't recall a time when I had to make them eat from those two food groups.  My 3 year old recently confessed to his Sunday school class that he loves lettuce.  What can I say, I'm one lucky mom!

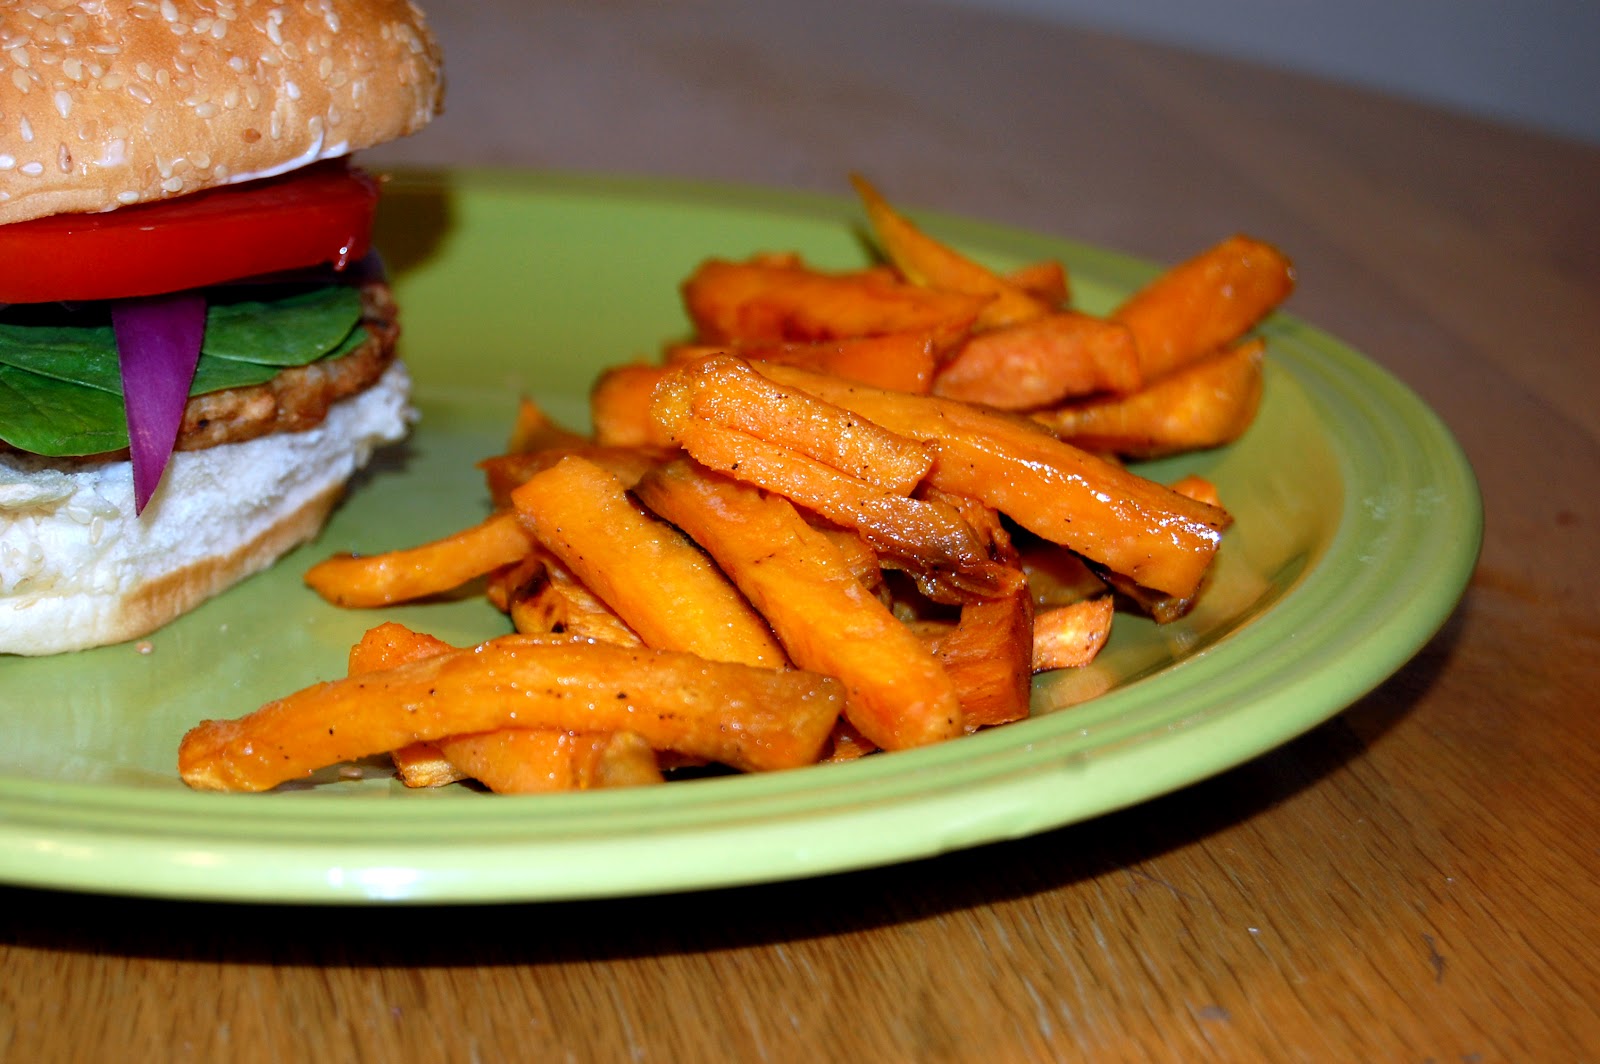
Here is a recipe my family likes to use when change things up to the regular potato fries.  I was very surprised at how good these came out..being a timid fan of sweet potatoes.  A few techniques will make your fries excellent!

Oven Baked Sweet Potato Fries
Serves ~ 2

©     2 medium Sweet Potatoes: peeled and cut into slightly thicker "French fries"
©     2 Tablespoon Olive Oil
©     1 Tablespoon light Brown Sugar
©     1/2 Teaspoon Salt
©     1/2 Teaspoon Black Pepper
 
 
1. Preheat the oven to 425 degrees F. Peel and cut potatoes. Soak in cold water for 20-30 minutes, this will aid in keeping the inside of the fries nice and moist. Mix sugar, salt, and pepper in a small bowl.
 
2. Drain potatoes and place into a microwave safe bowl and heat in the microwave for 3-4 minutes. Heating the drained potatoes will aid in soaking up the oil and spices.
 
3. Drizzle HOT potatoes with olive oil and sprinkle with spices. Mix well. Place potatoes onto a baking sheet lined with non-stick foil or parchment paper that has been lightly sprayed with cooking oil. Arrange potatoes into a single layer.
 
 
4. Bake potatoes 30-40 minutes. Check halfway through cooking, turn if necessary.
 
 
I hope you'll give these fries a go...try adding spices like Cayenne pepper. Garlic powder, or Taco seasoning mix for a spicier version.  Or add Nutmeg and a pinch of Cinnamon for a sweeter version.  Enjoy!

Monday, September 17, 2012

Chickpeas Sandwich

Summer bouquet from my summer flowers.

It is hard to believe that summer is leaving us. The cool mornings and evenings makes me want to pause and ponder upon the fading summer. Autumn...a time of reflection and review... I encourage everyone to take the time to slow down...turn on some relaxing music and take the time to reflect.

I'm thankful for everyone who emailed, called, wrote, and came up to check on me and to request more posts. I'm grateful for such wonderful family and friends! As you all know I have two toddlers who keep me very busy. God has granted me an opportunity to take part in several ministries within our church-about which I hope to share a little more in the future.  As the season turns I'm hoping to comeback and post more.


To start things up again, here's a recipe for a quick and filling chickpeas sandwich. I will say that this sandwich resembles a tuna sandwich. When eating a more plant based diet I discovered that trying to make non-meat dishes taste JUST LIKE meat dishes is setting yourself to fail. Instead, I like to recreate recipes and call them for what they are.


I'm probably the worst when it comes to eating lunch. I get so busy with the kids and the chores that I often forget to eat...This recipe is delicious and quick...just what I need when it comes to lunch time at my house. The recipe can also be adjusted to your taste, here's a couple of suggestions:  spicy brown mustard, sweet relish, pickles, green onions, parsley, kelp, nutritional yeast, cumin...use your creativity.


Resembling Tuna- Chickpeas Sandwich
Serves 2
 
©      1 can Garbanzo beans (Chickpeas) drained and coarsely mashed
©      2 Tablespoons diced Red/Yellow Onion
©      1 Tablespoon diced Celery
©      1+ Tablespoon Vegenaise/Mayonnaise/Olive Oil
©      1+ Tablespoon Lemon juice/Red or White Wine Vinegar
©      Salt and Black Pepper to taste

1. In a medium bowl, coarsely mash beans using a fork until you reach a desired consistency. I like a little more texture.
2. Add the rest of the ingredients to the beans and mix well. Taste and add more condiments (Mayo/Oil/Vinegar) to taste. Serve on sandwich bread or with whole grain crackers (an excellent packed lunch idea).


Happy Monday everyone!

Saturday, February 18, 2012

Red Quinoa Vegetable Salad


Are you finding yourself daydreaming of spring like I am?  Every year in the middle of February I get excited for spring!  Busy with cleaning, taking care of kids, and getting ready for a February birthday I often find myself struggling to nourish my body for lunch.  I often don't have the time to cook something and simply settle for something that will "carry me over to dinner."  Guilty...I know.  My sister and I made this quick salad one day and since then it is the recipe I turn to when I need a power boost in the middle of my day.  This Red Quinoa Veggie Salad is packed with good fats and protein yet SO quick and easy to make.  Plus leftovers can be used at dinner time, or the following day for lunch!


Makes ~6 cups

For the salad:
©     1 cup uncooked Red quinoa
©     1 (14oz) can beans, drained and rinsed (any variety)
©     1 sweet red pepper, chopped
©     1/4 cup fresh Cilantro, finely chopped
©     2 Green Onions, chopped
©     1 cup fresh corn (optional: don't use frozen or canned)
©     1 small avocado, chopped into 1 inch pieces

For the dressing:
©     4-5 tbsp lime juice (Juice from 2 small limes)
©     1/2 tsp salt, or to taste
©     1/2 tsp ground black pepper
©     1 garlic clove, minced
©     1/4 cup fresh Cilantro, finely chopped
©     1/4 cup extra virgin olive oil


Directions:
1. Cook 1 cup Red Quinoa according to package directions.
2. While quinoa is cooking, chop up vegetables and whisk together the dressing.


3. Allow quinoa to cool after cooking for about 10 minutes. Fluff with a fork.
4.  Combine the beans and vegetables and toss well.


4. Drizzle dressing over salad and toss well adding additional salt and pepper as needed. If desired, refrigerate salad before serving. Can refrigerate in a sealed container for 1-2 days.


I hope you'll take the time to nourish your body and soul this weekend!  Blessings!


Inspired by Epicurious

Saturday, January 7, 2012

Steamed Vegetables with Lemon-Garlic Dressing


Lightly steaming vegetables is a great way to lock in nutrients while increasing digestibility.  Here is a recipe of how I like to steam my vegetables.  The slightly "lemony" dressing is perfect with steamed veggies and the hint of garlic completes this easy side dish!  We like to vary the vegetables to what is in season...or what we have on hand.  (Serves 4)


Ingredients:
©      2 Carrots -cut into circles/half circles
©      1 medium Zucchini -cut into half circles
©      1 cup Cauliflower -cut into bite size florets
©      1 cup Broccoli -cut into bite site florets


Dressing:
©      Lemon Zest of 1/2 lemon
©      Lemon Juice of 1/2 lemon
©      2 tablespoons Olive Oil
©      1 clove Garlic -minced
©      1/4 teaspoon Herbamare, or any other herb seasoning salt
©      1/4 cup fresh Parsley - finely chopped


Directions:

1.  Place cut vegetables in a steamer basket over about 2 inches of water in a stock pot.  Place a lid on the pot and cook over medium heat.  Steam the veggies for 7-13 minutes-or until your toughest vegetable is crisp tender.


2.  While vegetables are steaming, prepare your dressing by combining all the ingredients together and mixing well. Remove vegetables from the steamer basket and place into a bowl.


3.  Pour dressing over steamed vegetables and toss carefully-not to mash your delicate vegetables.  Add additional Herbamare or other herb seasoning/salt if desired.  Serve immediately.


We enjoyed this easy side dish with a baked potato!  My son had fun telling us what colors he saw on his plate...and was very proud that he got to pull the carrots from our winter-raised-bed garden for the dish!  I hope you will treat yourself to this delicious side dish...it can easily be turned into a light lunch-just add some cooked rise.  Happy Saturday!!   


Saturday, November 26, 2011

Crispy Baked Potato


Looking for a easy dinner idea?  How about a baked potato with your favorite toppings?!?  This is not your ordinary baked potato with a saggy crust.  This recipe will give you a flavorful-moist potato flesh with a delicious, crispy crust.  My brother-in-law and his wife shared this wonderful recipe with me a couple of years ago and I haven't used a different recipe since!

I love the idea of a potato bar for a party.  Whether it's for bridal shower, small group dinner, baby shower, or a get together with friends.  It is a simple one plate meal that gives you, the hostess, the ability to socialize and have a good time!


Ingredients:
©    Baking Potatoes-I like to use Idaho baking potato
©    Butter Spread-any kind
©    Coarse Salt
©    Toppings of your choice...need some ideas?  See the bottom of the post.

Instructions:
1.  Wash potatoes using a vegetable scrub brush, wash well.

2.  Rub potatoes with your favorite butter spread: BlueBonnet/CountryCrock you can also use unsalted butter if you wish.  I like using LandOLakes all natural butter with olive oil.

3.  Sprinkle buttered potatoes with your favorite coarse salt.

4.  Place potatoes on a baking sheet lined with foil or use a glass casserole dish.  Do not wrap each potato in foil. 

5.  Bake the potatoes in a preheated oven at 450 degrees F for 45-65 minutes or until skin feels crisp but flesh beneath feels soft .

6.  Dress the baked potatoes with your toppings.


I sincerely hope you'll try this simple yet soooo delicious recipe!!


Here are some topping ideas:
©    Sour Cream
©    Butter
©    Cheese (melted cheese sauce or shredded)
©    Black Olives
©    Green Onions
©    Salsa
©    Chives
©    Bacon Bits
©    Sweet Bell Pepper
©    Cilantro
©    Chili (a recipe to come soon!)
©    Broccoli
©    Ham/Chicken/Turkey  cubes

Baked Potato with Steamed Vegetables