Tuesday, November 29, 2011

DYK: Table Salt Facts


Let's talk about salt..that's right the most simple, yet irreplaceable ingredients in the kitchen.  Salt is considered to be a life-sustaining ingredient for human kind.  The health benefits of good quality salt is incalculable.  But did you know the salt in your pantry might contain other ingredients in addition to salt?  I picked up a "Double Refined Iodized Salt" and looked at the ingredient statement, only to discover this list:  Salt, Sodium Silicoaluminate, Dextrose, Potassium Iodide 0.006%, and Sodium Bicarbonate.  You are more than welcome to google the extra ingredients...  Now let us compare this ingredient statement with a high-quality salt ingredient statement.


So, what do you look for in a top-quality salt?  The key thing to look in a quality salt is that it is unrefined and that it contains only one ingredient:  salt.  A good quality salt will often have a black, gray, or pink tint to it because of its natural mineral trace. 


One of my favorite unrefined sea salts is made by Redmond RealSalt which could be ordered online or purchased at your local co-op, health food store, or even local grocery store that sells baking goods by the pound.  I hope this DYK post will encourage you to look at the ingredient statement of your salt.  I encourage you to swap out your highly processed and chemically altered salt for some high-quality unrefined salt and I assure you your body will thank you along with our taste buds!!


Sunday, November 27, 2011

Blueberry-Banana Smoothie


I am a big fan of smoothies!  They make a delicious breakfast on the go or a nourishing afternoon snack.  This deep purple smoothie is made from only three simple ingredients:  bananas, blueberries, and non-dairy milk!  How simple is that?!?  

Do you ever have overripe bananas laying around begging to end their misery?  Here's a quick tip: freeze them!  That's right; peel them,  cut into chunks, and then place them into a bag/container in the freezer.  Freezing the banana will stop the ripening process and will make an excellent addition to a smoothie.  Using a frozen banana will give you a colder, more dense smoothie. 


Ingredients:
©    1 medium or large Banana (or two small ones)
©    1 cup frozen Blueberries
©    1 cup non-dairy Milk (Rice milk or Soy milk work the best)


Directions:
1.  Place the banana pieces(fresh or frozen), frozen blueberries, and the milk into the blender.  Blend until completely smooth, add more milk if needed.


Give this recipe a try and you too will become a fan of smoothies!  I hope this simple recipe will make your day a little brighter!!!

Saturday, November 26, 2011

Crispy Baked Potato


Looking for a easy dinner idea?  How about a baked potato with your favorite toppings?!?  This is not your ordinary baked potato with a saggy crust.  This recipe will give you a flavorful-moist potato flesh with a delicious, crispy crust.  My brother-in-law and his wife shared this wonderful recipe with me a couple of years ago and I haven't used a different recipe since!

I love the idea of a potato bar for a party.  Whether it's for bridal shower, small group dinner, baby shower, or a get together with friends.  It is a simple one plate meal that gives you, the hostess, the ability to socialize and have a good time!


Ingredients:
©    Baking Potatoes-I like to use Idaho baking potato
©    Butter Spread-any kind
©    Coarse Salt
©    Toppings of your choice...need some ideas?  See the bottom of the post.

Instructions:
1.  Wash potatoes using a vegetable scrub brush, wash well.

2.  Rub potatoes with your favorite butter spread: BlueBonnet/CountryCrock you can also use unsalted butter if you wish.  I like using LandOLakes all natural butter with olive oil.

3.  Sprinkle buttered potatoes with your favorite coarse salt.

4.  Place potatoes on a baking sheet lined with foil or use a glass casserole dish.  Do not wrap each potato in foil. 

5.  Bake the potatoes in a preheated oven at 450 degrees F for 45-65 minutes or until skin feels crisp but flesh beneath feels soft .

6.  Dress the baked potatoes with your toppings.


I sincerely hope you'll try this simple yet soooo delicious recipe!!


Here are some topping ideas:
©    Sour Cream
©    Butter
©    Cheese (melted cheese sauce or shredded)
©    Black Olives
©    Green Onions
©    Salsa
©    Chives
©    Bacon Bits
©    Sweet Bell Pepper
©    Cilantro
©    Chili (a recipe to come soon!)
©    Broccoli
©    Ham/Chicken/Turkey  cubes

Baked Potato with Steamed Vegetables

Wednesday, November 23, 2011

Thanksgiving reflection...


"How would you feel if you woke up today having only the things you have thanked God for yesterday?"


That was the questions a friend asked me in late October.  The question visited me often.  "Father God, forgive me...I have been very ungrateful." I pleaded.  I started to name of the things I am thankful for: food, house, clothes, job, water, family...the list went on...  When I paused to think, a thought came "think deeper...without what would your life be absolutely unimaginable?"  As I continued to reflect and study the Word of God.  It became clear to me, above everything else I am thankful for the salvation that I received.  The first week of December will mark 10 years since I accepted Lord Jesus Christ as my personal saver.   I am forever grateful for His sacrifice that was done for me, a sinner.  I am grateful that He, who knew no sin took upon Himself to save me and make me right with God.  I am thankful that through salvation my life is forever changed.  That my priorities and outlook on life are beyond the ever-changing world.  It brings great joy and peace to my soul to know that no matter what happens to my earthly matters, He is always in charge and will never-ever leave me.

So, this Thanksgiving I am thankful for all the things that I have, but above all, I am gratified for the salvation and the eternal peace that I have in my Lord, Jesus Christ.

I wish you all a very Happy Thanksgiving and may you also be filled with peace and serenity as you get together with family and friends!


Anastasia

Monday, November 21, 2011

Energizing Green Smoothie


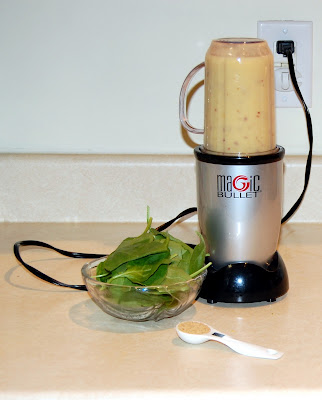
The holiday season is here!  I don't know how it's for you, but for me that usually means busy mornings.  This simple, yet sooo yummy smoothie is the recipe I use to nourish my family on such mornings.  My kids love this brilliant green drink for its taste. While my husband and I admire it for its nutritional wealth. The "skeleton recipe" is below.  I call it the "skeleton" because there are so many variations of this smoothie!  Try substituting the spinach leaves for kale, or adding some mint leaves.  Don't have a pear, no problem!  Just omit it and add some frozen blueberries.  You get the idea...  Ginger has a strong warming flavor for which you have to develop a taste.  For that reason, I exclude it when preparing the drink for the kids.


I love to pair this smoothie with a toast coated with pumpkin butter sprinkled with chia seeds or sunflower seeds.  I enjoy the pumpkin butter made by Kauffman's:
  (http://www.kauffmansfruitfarm.com/folder/%20%20318)  Kauffman's brand offers a variety of fruit butters without the extra ingredients.  Give them a try!


Ingredients: 
©      1 ripe Banana, peeled and broken into pieces
©      1 small Apple, cored and cut into chunks
©      1 small Pear, cored and cut into chunks
©      1 cup Baby Spinach leaves
©      1/2 to 3/4 cup Orange Juice (preferably not from concentrate)
©      1 to 2 teaspoons ground Flax seed
©      1 to 2 teaspoons fresh grated Ginger (1/4-1/2 teaspoons if using ground ginger powder (exclude if preparing for younger children due to ginger's strong flavor)


1.  Place the banana pieces, apple chunks, pear chunks, and orange juice into the blender.  Blend on high, stopping as needed to push the fruit down.


2.  Next add the spinach leaves, flax seed, and grated ginger; blend again until very smooth.  Add water or ice cubes if needed.  Blend until completely smooth and brilliant green in color. 


Whether you are getting up early for door-busters, getting started on the meal for a family gathering, or simply jumping into a hectic day with the kids; this delicious smoothie will recharge your body and give you the much needed energy to fully enjoy the joyful season!!!

Saturday, November 19, 2011

Wholesome Pizza


Thinking of ordering some pizza?  Sure takeout pizza is quick but on average when compared with homemade it has more calories and can be expensive.  Did you know a national brand takeout will contain around 550 calories for two slices!  Homemade pizza will contain roughly 350 calories for two slices.  This recipe will give you a healthier, cheaper, and delicious alternative.  The aroma of this pizza dough is AMAZING!!  It is unforgettable and memorable to which your senses will want to come back to again and again.  The Italian herb mix is the secret!  The garlicky sauce is just right, not too overwhelming and yet has a kick to it.  Don't let the number of ingredients in this pizza scare you off!  For toppings I used red onions, black olives, baby mushrooms, tomatoes, and cheese: Daiya (mozzarella).   

Pizza Dough
©      2 teaspoons Dry Active Yeast
©      300 mls Warm Water (100-110 degrees F)
©      1 teaspoon Salt
©      1 teaspoon Italian Herb Mix (recipe to follow)
©      1 tablespoon Sugar
©      1 cup Whole Wheat Flour
©      1 cup All-Purpose Flour (use additional 1/2 cup if needed)
©      Olive Oil

Toppings of Choice

Italian Herb Mix
©      1 teaspoon Garlic powder
©      1 teaspoon Salt
©      1 teaspoon Hot Pepper flakes
©      1 teaspoon Rosemary -fresh if possible
©      1 teaspoon Thyme -fresh if possible
©      1 teaspoon Onion powder
©      1 teaspoon Onion flakes
©      1/2 teaspoon Black Pepper
©      2 teaspoons Sugar
Tomato Sauce
©      1 can (8oz) Tomato Sauce
©      2 tablespoon Parmesan Cheese
©      1 tablespoon fresh ground Garlic
©      2 teaspoons of Italian Herb Mix

Directions: 
1.  Prepare the tomato sauce:  mix well and allow the ingredients to "marry" in the refrigerator for at least 20 minutes. *The sauce is a bit spicy: if preparing for younger children, leave a few tablespoons of the plain Tomato Sauce and allow them to create their own "mini pizza!"
My son helping out :-)

2.  Prepare the Italian Herb Mix by mixing all the ingredients together.  This can also be done ahead of time: keep in an air time container.
3.  Prepare the crust in your mixer bowl using the dough hook.  Or simply knead the dough by hand. 
4.  Using a whisk, combine dry Yeast and warm water.  Let stand for a couple of minutes.  Add salt, Italian Herb Mix, and sugar; mix well and allow to stand for a couple of minutes.
5.  Add flour and knead until an elastic ball forms.  Transfer the dough into an oiled bowl, cover with oiled clear plastic.
6.  Place in a turned OFF Oven with lights ON to let it double in size.  Knead the dough down, and allow to double in size again if time allows.
7.  Roll out the dough into a circle or square, who said pizza has to be round :-)  Make thick or thin crust.  Brush the rolled out crust with Olive Oil, spread Tomato Sauce, sprinkle with cheese, add desired toppings and finish off with a layer of cheese. 


8.  Bake at 450 degrees F until cheese starts to turn slightly golden, about 20-35 minutes:  longer time is needed if you are using meat toppings   


My son's mini pizza.

I hope this will encourage you to try a homemade pizza and have fun making it!  Save money and invest in your health!  May you and your loved ones be well nourished!


Italian Herb Mix inspired by Chef Tomatza

Monday, November 14, 2011

Simply Delicious Lentil Tacos


Today is a very special day!!!  November 14th marks the birthday of my best friend and my wonderful sister-in-law!!!  Double joy!  To celebrate I decided to cook something dear to my family.  I have been craving a Mexican dish for a week or two now.  So today was the perfect day to find a vegan rival to my original meaty tacos.  Lentils are considered to be the “power house” of protein per pound.  Sadly to say…before going vegan I have never cooked with lentils.  Today I will share one delicious and not to mention very simple recipe using the ever powerful, yet cheap legume! 

Ingredients:
©       1 Tablespoon Canola Oil
©       1/2 medium yellow Onion, finely chopped
©       1 small clove Garlic, finely chopped
©    2 1/2 cups Vegetable Broth
©       1 cup Lentils, rinsed and drained
©       1 package Taco Seasoning Mix (1.25oz)
*Don’t want to use store bough seasoning?  Or simply don’t have one on hand?  Not a problem!!  Substitute the ready package of seasoning with: 1 Tablespoon Chili Powder, 2 Teaspoons ground Cumin, 1 Teaspoon dried Oregano, Salt and Black Pepper to taste.*

Toppings:
©       Soft/Crunchy taco shells (may use flour tortillas)
©       Shredded lettuce
©       Diced tomatoes
©       Diced avocado
©       Cheese-Daiya is our vegan favorite brand
©       Salsa/hot sauce

Directions:
1.  Sauté onion and garlic in canola oil in a medium size pan.  Stirring frequently, cook until onion is transparent.  If onion starts to burn, add a couple of tablespoons of vegetable broth.
2.  Add well rinsed and drained lentils and taco seasoning, mix well.  Add the vegetable broth and bring to a boil, mixing frequently to prevent burning.
3.  When mixture begins to boil, reduce the heat to low and cover with a lid.  Allow the mixture to simmer the whole time, mixing frequently (every 5-7 minutes) and covering again.  Simmer for 25-30 minutes.
4.  At the end of cooking time taste lentils, they should hold their body, yet be soft.  Gently mash the lentils to the desired consistency using a potato masher: I mashed mine mildly to preserve the coarse texture.  Leave the mixture on the hot stove (on off) and allow the mixture to thicken slightly.
5.  Prepare the toppings:  Shredded lettuce, diced tomatoes, diced avocado...use your favorite toppings! 
6.  Assemble tacos by placing lentil mixture and your choice of toppings.


I do hope you will give these a try!  Let me know what you think.  May everyday be a special day in your home with your loved one!  Happy Monday!!!

©To all the moms who are cooking for the younger kids, the “meaty” sauce is slightly spicy; consider using the seasoning suggested instead of the Taco Seasoning Mix.


Recipe inspired by Michelle Thomas from allrecipes.com

Wednesday, November 9, 2011

DYK: So you love COFFEE...


Are you one of those people who cannot survive a day without coffee? Or simply enjoy a cup or two on a weekend? Did you know you can make your coffee a bit healthier by adding three simple ingredients?!? Coffee is a diuretic therefore it has a depleting effects on your adrenal and nervous system. To counter act the depleting effects simply add a pinch of ground ginger and cardamom. Both spices can be found in the spice section of your grocery store. Coffee's acidity is hurtful to your gut. A pinch of salt can minimize the ill effect.

Simply add the three ingredients to your fresh cup of coffee or add it to the ground beans right before brewing! Give it a try and see for yourself...the best thing, you will not be able to tell the difference in the taste but your body will thank you. Wishing you a steamy cup of great coffee with a loved one!!


Resources:  "The New Whole Foods encyclopedia" R.Wood  &  "Foods that Harm Foods that Heal"   Reader's Digest

Monday, November 7, 2011

DIY: Pumpkin Arrangement


Whether you are hosting a Thanksgiving dinner this year or planning to attend a family gathering, a pumpkin arrangement is a charming addition to any table.  I will show you just how easy it is to make a beautiful arrangement for the heartwarming season.  The great thing about this project is that it is SO versatile!


You will need:
©  1 Pumpkin (any size, shape, color)
©  Floral Foam (size will vary according to your pumpkin size)
©  Flowers (I used roses, sunflowers, mums, gerber daisies)
©  Autumn leaves
©   Autumn berries
©  Sharp knife and/or Trimmer
©  1 Wooden Kabob Stick

1.  Cut out an opening in the pumpkin, it does not have to be perfect.  Save the top if you wish to use it in the arrangement (although you do not have to).  Scrape all the seeds and the flesh out and discard.  (SAVE the pumpkin seeds!  Roast and enjoy!)

2.  Cut foam to fit into your pumpkin.  Float foam in cold water until foam is completely saturated.  DO NOT force foam under water, doing so will create pockets of air inside your foam.  When the foam is floating at water level, place foam into the pumpkin.
3.  Now you are ready to place your leaves and berries.  When finished, secure the saved top of the pumpkin on the wooden stick and into the center of the pumpkin, leaning to a side. 


4.  Starting from your biggest flowers start filling in.  Continue with medium  and then the smallest flowers to hide the foam.  I started with sunflowers, followed with the roses and the gerber daisies.  Next I added some berries and finished off with mums.  And you are done!  I hope you enjoyed this DIY project and give it a try.  I wish you and your home heartwarming get-togethers this Thanksgiving!  Blessings unto you.