Friday, May 11, 2012

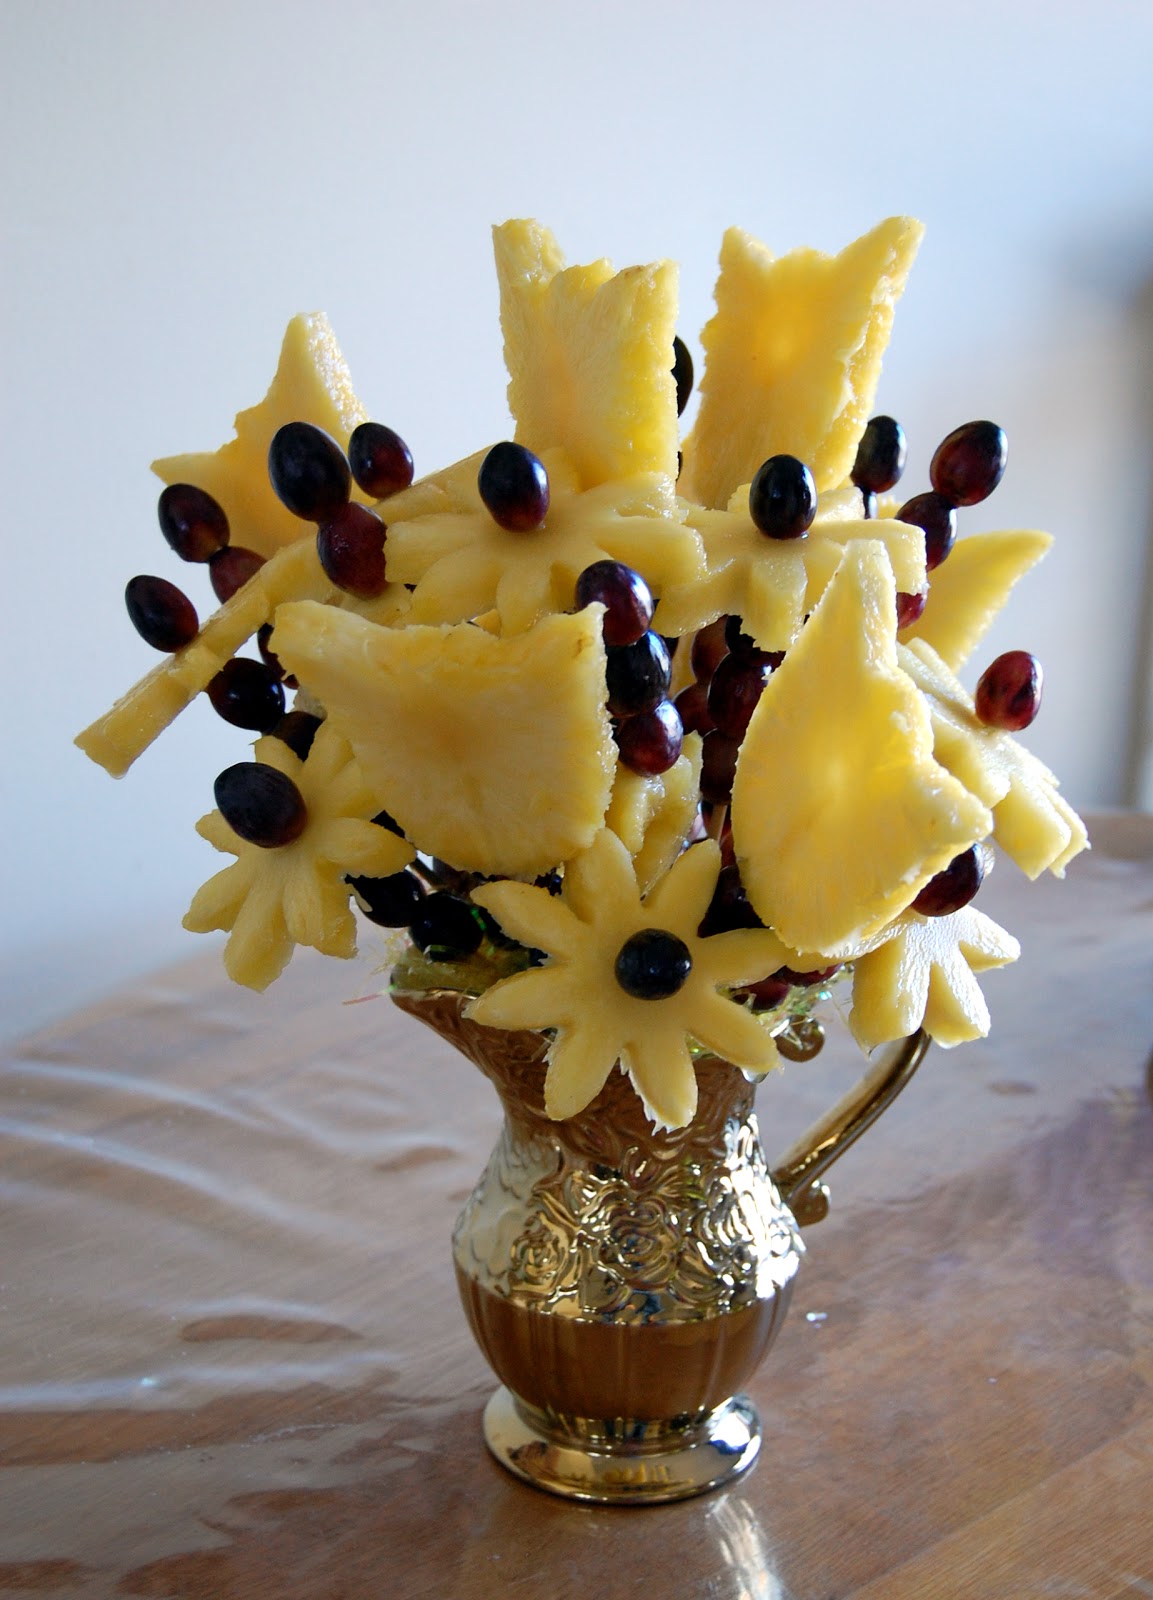
Sunny Pineapple Fruit Arrangement


Happy Mother's Day to all the wonderful mothers!!! 


Your heart is like a garden
With the gateway open wide,
And all who will may enter,
Finding peace and love inside.
There are roses for remembrance
Of happy by-gone days,
Forget-me-nots that symbolize
Your ever-thoughtful ways.
Shy violets for your modesty
And pansies for the tender thoughts
You always have of others.
And from my childhood, Mother,
My joys have had their start
In that place of truth and beauty--
The garden of your heart.
                                             (unknown author)

How about adding a festive pineapple fruit arrangement to your celebration!  This is supper easy to make and is wonderful to give as a gift...not to mention delicious!


©      2 Pineapples: cut into 1/2-3/4 inch circles
©      1 1/2 pounds Red Grapes
©      Container of choice
©      Foam: preferably green in color
©      Decorative grass/kale/lettuce/ or green tissue paper: to cover the foam
©      8 inch Wooden Skewers
©      Flower cookie cutters-preferably not plastic

Directions:
1.  Place foam into the container of choice. If foam is moving in the container, secure with tape running across making an "x." Cover foam with grass, green tissue paper or kale/lettuce: secure kale/lettuce with toothpicks broken in half if needed.
 

2.   Cut pineapple into circles 1/2 to 2/4 inches thick.  Using the cookie cutters- cut out flowers:  I used tulip and "pointy" 8 petal daisy.  My cookie cutters are made from stainless steel: you can use plastic cookie cutters if that is all you have, simply use a knife to cut out the flower.


3.  Place pineapple flowers onto the wooden skewers.  Leave the daisy flowers without a grape center for easier placement.  Start making the arrangement from the middle.  The tallest flowers should be at the top, keep working on it and it'll eventually start looking like an arrangement. 


4.  When all pineapple flowers are in, place grape centers on daisy flowers.  Fill space between flowers with grapes on skewers and you're all done! 

5.  Serve immediately or refrigerate covered for up to 6 hours.  Making an arrangement ahead of time but don't want the fruit to turn brown?  Soak fruit flowers in ginger ale for 10 minutes (I hear any lemon-lime soda also works).  The best thing, pineapple will still taste like pineapple!


Who can find a virtuous woman? for her price is far above rubies.
Strength and honor are her clothing; and she shall rejoice in time to come.
She openeth her mouth with wisdom; and in her tongue is the law of kindness.
She looketh well to the ways of her household, and eateth no the bread of idleness.
Her children arise up, and call her blessed; her husband also, and he praiseth her.
Many daughters have done virtuously, but thou excellest them all.
Favor is deceitful, and beauty is vain: but a woman that feareth the Lord, she shall be praised.
Give her the fruit of her hands; and let her own works praise her in the gates.
- Proverbs 31: 10, 25-31

Happy Mother's Day Everyone!!!

Monday, May 7, 2012

Refreshing Strawberry Lemonade


Greetings everyone!!!  I know...it's been a while since I posted.  My life recently became supper busy without a single cause.  It's like on a fast-forward mode at all times!  I must admit I did miss blogging...so here I am! 
It is finally spring!!!  One of my favorite times of the year! I love spring for its new beginnings and ofcourse for all the fresh berries, fruits, and veggies!  Strawberry season is here.  I recently visited the local "pick your own" farm and was not a bit disappointed.  Little compares to the freshly picked strawberry.  If you're looking for a local farm from which you can pick berries or fruits check this web site out:  http://www.pickyourown.org/ Not only does this web site provide locations of the farms near you, but it also has helpful hints how to preserve food.  The link even has locations outside the USA!
Here is the latest drink I am enjoying on the hot spring days: homemade strawberry lemonade.  This drink is super easy and SO refreshing!  It is versatile and can be tweaked to fit your taste buds.  For a sweeter lemonade add less lemon juice or add more of the sweetener: honey or agave nectar.  Dress up with peppermint leaves for that special occasion.  Disclaimer-  I only tried this drink using the freshly picked strawberries...not sure how it'll taste with store bought ones.
(Makes 1 serving)
Ingredients:
©      1 cup fresh Strawberries-hulled and quartered
©      1 tablespoon Sugar
©      2 tablespoon Lemon Juice (add less for a sweeter lemonade)
©      1 1/2 cups ice cold Water
©      Honey or Agave Nectar to taste-optional

1.  Place cut strawberries in to a plate and sprinkle with sugar.  Allow to stand for 2-4 minutes.

2.  Place sweetened strawberries, lemon juice and water into a blender.  Add a couple of ice cubes for a colder drink.
3.  Blend 1-2 minutes: until even in consistency and has no chucks.

4.  Taste and add additional honey or agave nectar as needed to sweeten the drink.  I added 1/2 teaspoon of local honey.  Blend for additional 20 seconds to mix the sweetener-if added.

5.  Pour over ice cubes and enjoy!  It'll be gone before you know it!


Monday, March 26, 2012

The Very Hungry Caterpillar Birthday


With much joy I get to plan a child's birthday twice a year!!  Having a boy and a girl makes it double the fun!  For my son's second birthday we settled on the theme around the book by Eric Carle "The Very Hungry Caterpillar."  Months before the party my son requested that story to be read over and over.  We even watched the cartoon made from the story.  So choosing the theme was not difficult! 


I should mention, the daffodils are a tradition that we started from the first birthday of our son.  My husband loves daffodils and now it simultaneously reminds us all of our son's birthday.  Here is what our Birthday Party looked like:    


The sandwiches decorated by veggies and cheese made into butterflies, lady bugs, and beetles.   Three varieties of salsa with different chips. 


The cake was ofcourse-the Caterpillar itself.  Fruit on wood kabob sticks/skewers.  Stained glass Jello which is not photographed.


For activities:  My lovely sister read the story by Eric Carle "The Very Hungry Caterpillar."  She read it in English and retold it in Russian.  We have three languages within our family :-)  Russian, Spanish, and English...so it's very interesting at time!  The kids enjoyed the traditional "pin the tail on the donkey" activity: which they loved!  We also did "grow animal capsules" and the kids guessed which animal they had before they fully formed.


I hope this will give you some ideas if you're planning a party around "The Very Hungry Caterpillar" story.  May your birthday celebrations bring you joy and happiness!


Wednesday, March 7, 2012

DIY Layered Ribbon Vintage Flower Hair Clips


One of my simple pleasures in life is making hair clips.  I love making them not only for my daughter, but for myself as well!  This is my first attempt to do a blog on how I make hair clips.  I wanted to create something bigger and different than your ordinary clips that could be purchased at the accessory isle.  I was very happy with these vintage looking flowers that will be perfect for my daughter's pig tails!  These can also be glued to a headband or sewed onto any article of clothes! 

What you'll need:
©      2 Ribbons of choice (mine were about 15inches long and 1.5inches wide)
©      Button of choice
©      Clip of choice or headband
©      Needle
©      Thread to match the ribbons
©      Felt or other material
©      Hot Glue Gun


Directions:
1.  Sew a running stitch on one side of your ribbons.  You can also do this on a sewing machine if you would like. 


2.  Gently pull the thread to make the ribbon form a flower.  Secure both sides to make sure you don't pull the thread completely out.  (Pull only one thread if you used the sewing machine to gather your flower.)


3.  Sew a running or hemming stitch to bind the ends of the ribbon to secure the flower. 


4.  Stack two ribbon flowers together and attach the button of choice using the needle and thread.  Dont' worry if it doesn't look neat, it will be covered up :)  If the button appears too small and is falling through the center of the layered ribbons; simply tighten up the ribbons by pulling on the thread. 

5.  Cut a circle out of the felt/material big enough to cover the back of the flower.  Using the hot glue gun, glue the cut out felt circle to the back of the flower. 


6.  Use a strip of felt, ribbon, or any material to secure the clip onto the flower.  The clip can also be completely lined with ribbon to hide the metal clip. 


I am forever thankful for having a little girl!!


Monday, February 27, 2012

Mushroom Stir Fry


This is one of our favorite mushroom stir fry recipes!  It is a sweet yet spicy dish with a whole lot of flavor!  You'll not miss the meat in this one!  The mushrooms add the "meaty" taste without the heavy aftereffect.  Even though the glaze and the sauce might make you think this is a complex recipe, don't let it fool you.  This delicious, yet simple stir fry is a perfect addition to any kitchen's repertoire during the cold winter days!  (This dish might be a bit too spicy for the younger members of the family) 

Serves 4

Ingredients: 
Stir Fry
©      1 lb mixed Mushrooms (oyster, crimini, button, shitake, enoki...whatever you like), quartered, or cut in strips...however you like your mushrooms in stir fries
©      3 to 4 cups Snow or Snap Peas
©      1 cup Broccoli Florets-cut into bite size pieces and cooked in microwave for 2 minutes
©      1/2 cup Baby Corn -optional
©      5 Garlic cloves-sliced thinly
©      8 Green Onions, cut into 1 inch strips
©      1 tablespoon grated Ginger
©      1/4 -1/2 teaspoon dried Chili Flakes
©      3 tablespoons Sesame or Grapeseed Oil
©      Toasted Sesame seeds for garnish-optional

Mushroom Glaze
©      1/3 cup Vegetable Stock (may use chicken broth)
©      1 tablespoon Honey
©      1 tablespoon Soy Sauce

Sauce
©      3/4 cup Vegetable Stock (may use chicken broth)
©      4 tablespoons Honey
©      3 tablespoons Soy Sauce
©      1 tablespoon Rice Vinegar
©      2 tablespoons cooking Sherry or cooking Wine
©      1 tablespoon Corn Starch (additional 1/2 teaspoon if you want a thicker sauce)

Directions:
1.  Make mushroom glaze in a small bowl by whisking all the ingredients together and set aside.  Make the sauce in a medium size bowl by whisking all the ingredients together, making sure the corn starch dissolves completely without clumps, set aside.


2.  Place 1 tablespoon of Sesame/Grapeseed oil in a large skillet or wok over high heat.  Add mushrooms when oil is glistening and gliding on sides of wok.  Cook mushrooms for about 2 minutes, stirring occasionally until they begin to give up water. 

3.  Add the glaze to the mushrooms and cook on high heat for 4-5 minutes, occasionally stirring until barely any more liquid remains.  Remove cooked mushrooms onto a plate and set aside.

4.  Return the wok to the stove.  Reduce the heat to medium and add the remaining 2 tablespoons of oil.  Add garlic, ginger, and chilies and cook stirring occasionally for about a minute; taking care not to burn the garlic.  Add peas, cooked broccoli, baby corn, and 2 tablespoons of water; mix and cover with a lid to "steam" the veggies for 2-3 minutes.  Cook less for crispier veggies. 


5.  Increase heat to high and add the sauce and green onions.  Allow the mixture to come to a boil.  The sauce will thicken slightly.  Add the cooked mushrooms back to the mixture and cook for another minute.  Take off heat and serve over rice garnishing with sesame seeds if desired.


Happy Monday veryone!  Blessings!


Inspired by: Simply Recipes

Friday, February 24, 2012

Okra Vegetable Soup


The weather is rather chilly today and a bowl of hearty soup is a welcoming thought!  Since I had all the ingredients on hand, I decided to make my okra vegetable soup.  I never had the famous gumbo, so having nothing to compare to I can't officially call this "Vegetable Gumbo" but that is what my family refers to it by.  This soup is easy to make, doesn't have fancy ingredients, and deliciously filling.  You can make the soup match your taste buds by simply tweaking the ingredients. 


Serves 6

Ingredients:
©      2 tablespoons Flour
©      3 tablespoons Butter/Margarine (Earth Balance to make it 100% vegetarian)
©      1 medium Onion- chopped
©      2 Garlic cloves-chopped
©      1 Bell Pepper-chopped (I used 1/2 Yellow and 1/2 Red)
©      2 stalks of Celery-chopped
©      1/2 cup Frozen/Fresh Corn
©      1 cup Frozen/Fresh Okra-coarsely chopped
©      3-5 tablespoons Tomato Sauce or V8 vegetable juice
©      1/4 cup instant Brown Rice/Cooked Rice
©      1/4 cup quick Pearled Barley
©      5-6 cups Vegetable Bouillon (I used 3 cubes of vegetable bouillon with 6 cups of water)
©      1 tablespoon Parsley flakes or handful coarsely chopped fresh Parsley
©      1/2 teaspoon Smoked Paprika
©      Herbal Seasoning Salt to taste (I use Herbamare)


Directions:

1.  Prepare all the vegetables before starting the base of the soup.

2.  Make the roux-or the base of the soup by melting butter in a cast iron pot on medium heat.  Add flour and mix using a whisk, mix frequently, taking care not to burn.  The roux will expand and start turning a golden color.  Constantly mixing, continue to "brown" the roux until it reaches a dark tan/light brown color 3-4 minutes:  this will add the rich "roasted" feel to the soup.

3.  Add the chopped onions, garlic, pepper, celery, and okra if using FRESH ONLY.  Sauté the vegetables for 2-3 minutes: if using fresh okra cook until the slimy texture disappears.

4.  Add the tomato sauce or juice to the vegetables:  add more if you like the "tomato" taste in your soup.  Continue to cook for additional 1-2 minutes.

5.  Add corn, frozen okra-if using, instant rice or use leftover cooked rice, pearled barley, and vegetable bouillon.  Mix and bring to a boil.  Add parsley, paprika, and seasoning salt to taste.   Turn heat to low and allow to simmer for 10 minutes.  Taste, add additional seasoning to match your preference, try adding: Tabasco sauce, Worcestershire sauce, thyme, or some Cajun seasoning. 


Bon Appetit my lovely readers!

Monday, February 20, 2012

Homemade Pancakes & Baked Apple Slices


My husband and I love to make pancakes on our slow mornings!  I used to use pancake mix until I decided to try to make my own batter.  After a couple of trials, I stopped on our favorite recipe.  We have been making these pancakes for a number of years now and we love them!  They are everything a pancake should be...in our eyes anyway!  Recently I have been dressing them with Baked Apple Slices.  These apple slices are super easy to make and so delicious!  Nothing says "Breakfast at Home" like these pancakes and baked apple slices!

Makes ~10 medium size pancakes


Pancakes
©      1 cup Flour
©      2 tablespoons Sugar
©      1 tablespoon Baking Powder-newly opened for best results (within 30 days)
©      1/2 teaspoon Salt
©      1 teaspoon Lemon Zest
©      Sprinkle of Cinnamon
©      1 Egg- room temperature for best results
©      1 cup Milk-room temperature for best results
©      2 tablespoons Oil
©      1 teaspoon Vanilla Extract


Directions:
1.  Combine dry ingredients in a small bowl, mix well.  Combine wet ingredients in a medium size bowl and mix well using a whisk.  Add dry ingredients to the wet ingredients and whisk well for 1-2 minutes.

2.  Heat griddle or frying pan over medium-high heat.  Reduce heat to medium when griddle is hot and apply a light coat of non-stick spray-I like to do this only with the first pancake.  Pour/scoop the batter onto the griddle, using about 1/4 cup for each pancake.  Wait until the entire pancake has "bubbles" before turning.  Continue with the rest of the batter.  Cover cooked pancakes with clear-saran wrap for a couple of minutes until you are ready for them!


Baked Apple Slices
©      2 Apples-peeled, cored, and sliced any variety (my favorite Fuji or Granny Smith)
©      2 tablespoons Maple Syrup
©      Sprinkle of Cinnamon
©      1 tablespoon Lemon Juice (optional)
©      1 teaspoon of brown Sugar (optional)
©      1/4 teaspoon Salt (optional)

Directions:
1.  Place sliced apples into a microwave safe bowl.  Sprinkle with cinnamon and if using; lemon juice, sugar and salt.  Toss gently.  Add good quality maple syrup and again mix.

2.  Microwave for 2-5 minutes, depending on the thickness of your apple slices and how tender you like them to be.  Test doneness with a fork.  Serve over pancakes!


I so hope you will give these recipes a try!  You'll not regret it!  At any rate, you can always go back to the box mix and canned apples  ;-)  Happy Monday Everyone!!