Showing posts with label Centerpiece Arrangement. Show all posts

Friday, May 11, 2012

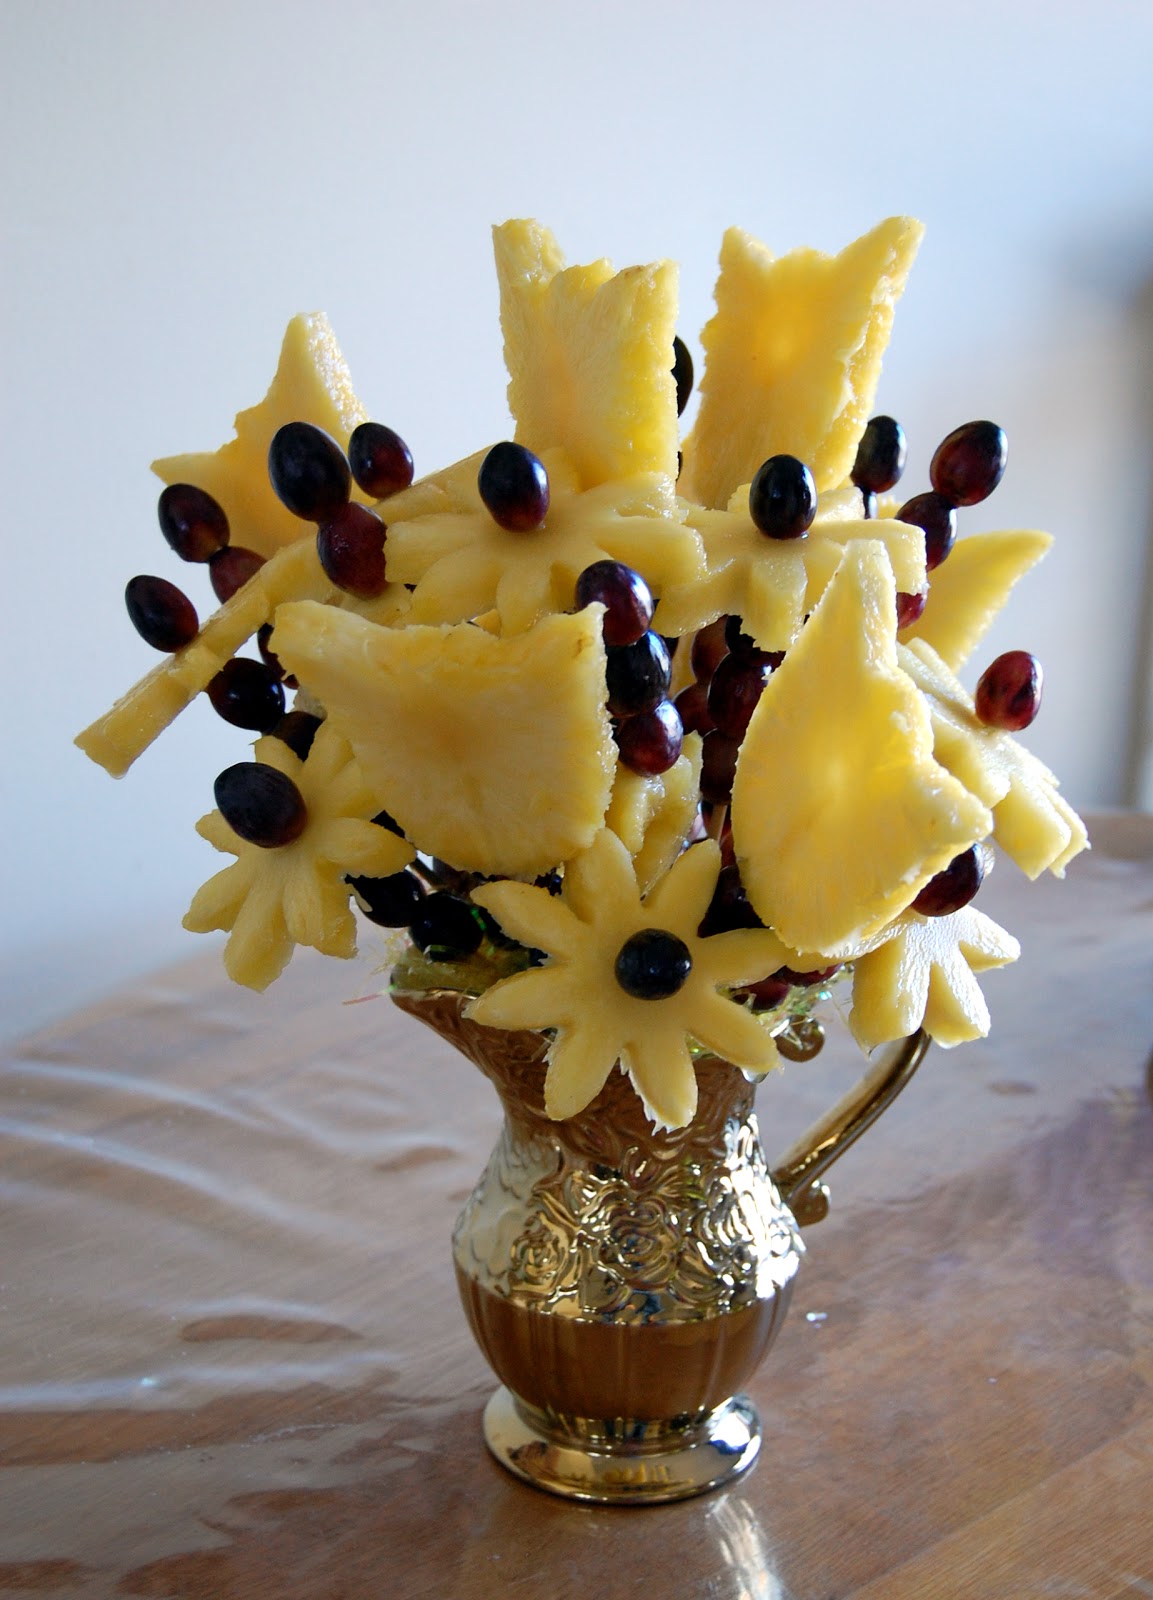
Sunny Pineapple Fruit Arrangement


Happy Mother's Day to all the wonderful mothers!!! 


Your heart is like a garden
With the gateway open wide,
And all who will may enter,
Finding peace and love inside.
There are roses for remembrance
Of happy by-gone days,
Forget-me-nots that symbolize
Your ever-thoughtful ways.
Shy violets for your modesty
And pansies for the tender thoughts
You always have of others.
And from my childhood, Mother,
My joys have had their start
In that place of truth and beauty--
The garden of your heart.
                                             (unknown author)

How about adding a festive pineapple fruit arrangement to your celebration!  This is supper easy to make and is wonderful to give as a gift...not to mention delicious!


©      2 Pineapples: cut into 1/2-3/4 inch circles
©      1 1/2 pounds Red Grapes
©      Container of choice
©      Foam: preferably green in color
©      Decorative grass/kale/lettuce/ or green tissue paper: to cover the foam
©      8 inch Wooden Skewers
©      Flower cookie cutters-preferably not plastic

Directions:
1.  Place foam into the container of choice. If foam is moving in the container, secure with tape running across making an "x." Cover foam with grass, green tissue paper or kale/lettuce: secure kale/lettuce with toothpicks broken in half if needed.
 

2.   Cut pineapple into circles 1/2 to 2/4 inches thick.  Using the cookie cutters- cut out flowers:  I used tulip and "pointy" 8 petal daisy.  My cookie cutters are made from stainless steel: you can use plastic cookie cutters if that is all you have, simply use a knife to cut out the flower.


3.  Place pineapple flowers onto the wooden skewers.  Leave the daisy flowers without a grape center for easier placement.  Start making the arrangement from the middle.  The tallest flowers should be at the top, keep working on it and it'll eventually start looking like an arrangement. 


4.  When all pineapple flowers are in, place grape centers on daisy flowers.  Fill space between flowers with grapes on skewers and you're all done! 

5.  Serve immediately or refrigerate covered for up to 6 hours.  Making an arrangement ahead of time but don't want the fruit to turn brown?  Soak fruit flowers in ginger ale for 10 minutes (I hear any lemon-lime soda also works).  The best thing, pineapple will still taste like pineapple!


Who can find a virtuous woman? for her price is far above rubies.
Strength and honor are her clothing; and she shall rejoice in time to come.
She openeth her mouth with wisdom; and in her tongue is the law of kindness.
She looketh well to the ways of her household, and eateth no the bread of idleness.
Her children arise up, and call her blessed; her husband also, and he praiseth her.
Many daughters have done virtuously, but thou excellest them all.
Favor is deceitful, and beauty is vain: but a woman that feareth the Lord, she shall be praised.
Give her the fruit of her hands; and let her own works praise her in the gates.
- Proverbs 31: 10, 25-31

Happy Mother's Day Everyone!!!

Wednesday, January 25, 2012

DIY: Fancy Chocolate-Covered Strawberries


Chocolate-Covered Strawberries is an iconic romantic food.  Although it can look complicated and hard, it really is not that difficult with a little practice.  I enjoy making these simple treats especially when it's strawberry season!  Here is how you can delight your loved one this Valentine's day with some fancy chocolate-covered strawberries!

This will make 1 small bouquet
Ingredients:

©      5 oz Semi-Sweet Chocolate:  you can use a bar, chips, morsels, or even baker's squares-chop coarsely if using.  Remember the better quality chocolate you have the better taste and texture you'll get.  I like to use Ghirardelli chocolate.
©      5 oz White Chocolate (optional)
©      Carton of fresh Strawberries:  washed and dried.  When picking strawberries, pick the smaller ones:  they'll be more ripe and they'll hold up better on the toothpick in the bouquet.
©      Grapes: washed and dried
©      Toothpicks
©      Container of choice
©      Kale/Lettuce or green tissue paper: to cover the foam
©      Styrofoam block or regular foam block
©      extras:  coconut flakes, sprinkles, finely chopped nuts, mini chocolate chips


Directions:

1.  I like to begin by writing down the different varieties of strawberries I want to make-dark chocolate with coconut, dark chocolate drizzled with white, plain red...etc.

2.Wash strawberries and lay them on a towel/paper towel to dry.  Chocolate will not stick to strawberries if they are wet, pat each strawberry with dry towel/paper towel to make sure they are completely dry before submerging them into chocolate!

3.  Place foam into the container of choice.  If foam is moving in the container, secure with tape running across making an "x."  Cover foam with green tissue paper or kale/lettuce:  secure kale/lettuce with toothpicks broken in half if needed.

4.  Prepare strawberries by placing one grape on to a toothpick and follow by a strawberry, piercing the strawberry half way:  You should not see the toothpick at the top of the strawberry.  I find that strawberries hold up better if there is a grape supporting it-it is totaly optional.  Repeat with all the strawberries. 

5.  There are two ways to melt the chocolate.
    Microwave:
Use a glass bowl and microwave the chocolate on medium power at 30-second intervals-mixing in between.  You don't want to burn the chocolate, be sure to  mix after each interval.  Total amount of time will depend on the brand of chocolate and the size of chocolate pieces.

    Double Boiler:
Make a double boiler by placing a glass bowl that fits snugly over the top of a saucepan-the bowl should not be touching the bottom of the pan.  Fill the saucepan with hot water from the tap. You want enough water to provide heat, but not so much that the bottom of the chocolate bowl touches the water.  Bring the water to a simmer and keep it at a low heat:  you don't want the water boiling, just simmering.  Place the glass bowl with chocolate on top of the sauce pan and allow the chocolate to melt slowly-mixing frequently with a rubber spatula or a wooden spoon.

*Tip if you plan to use both dark and white chocolate melt the chocolate one at a time.  Starting with dark-it is less fussy when melted :)  Melt white chocolate very slowly-it is more fragile and burns quickly.

6.  Holding the strawberry by the stem end and the toothpick, dip in the melted chocolate, letting the excess chocolate drip off. 

    1.  For a plain chocolate covered strawberry-carefully place the covered strawberries into the styrofoam block to dry off. 
    2.  For more festive strawberries-dip into coconut flakes or chopped nuts while chocolate is still wet. 
    3.  For strawberries with sprinkles; holding the freshly chocolate coated strawberry over a plate, sprinkle with desired sprinkles.
    4.  For a multi-colored/drizzled effect:  Take a cooled chocolate covered strawberry and using a fork drizzle lines of the opposite chocolate over the melted chocolate bowl...twisting the strawberry to get the drizzle effect all around.

Plain Red Strawberries, Plain Chocolate Covered Strawberries, and Chocolate Covered Strawberries dipped in Coconut

8.  Continue covering all the strawberries.  Allow the chocolate to cool and to firm up; to speed up the process place the strawberries into the refrigerator while still on the styrofoam block for 10-15 minutes.


9.  When chocolate is firm start arranging the bouquet.  I find it easier to start at the bottom and work up.  Marbles strawberries are more fragile, handle with extra care not to smudge.


10.  Fill any holes with extra pieces of kale/lettuce if needed.  Refrigerate for up to 1 day, eat the day made for best results.   

Plain Red Strawberries, Plain Dark and White Chocolate Covered Strawberries, White Chocolate Covered Strawberries Drizzled with Dark Chocolate and Chocolate Covered Strawberries dipped in Coconut, Sprinkles


I love making these sweet treats!  I made multiple bouquets for weddings and anniversary parties.  They also make a great birthday gift!  Let me know if you're interested in seeing more of the fruit arrangement how-to's. 

Monday, November 7, 2011

DIY: Pumpkin Arrangement


Whether you are hosting a Thanksgiving dinner this year or planning to attend a family gathering, a pumpkin arrangement is a charming addition to any table.  I will show you just how easy it is to make a beautiful arrangement for the heartwarming season.  The great thing about this project is that it is SO versatile!


You will need:
©  1 Pumpkin (any size, shape, color)
©  Floral Foam (size will vary according to your pumpkin size)
©  Flowers (I used roses, sunflowers, mums, gerber daisies)
©  Autumn leaves
©   Autumn berries
©  Sharp knife and/or Trimmer
©  1 Wooden Kabob Stick

1.  Cut out an opening in the pumpkin, it does not have to be perfect.  Save the top if you wish to use it in the arrangement (although you do not have to).  Scrape all the seeds and the flesh out and discard.  (SAVE the pumpkin seeds!  Roast and enjoy!)

2.  Cut foam to fit into your pumpkin.  Float foam in cold water until foam is completely saturated.  DO NOT force foam under water, doing so will create pockets of air inside your foam.  When the foam is floating at water level, place foam into the pumpkin.
3.  Now you are ready to place your leaves and berries.  When finished, secure the saved top of the pumpkin on the wooden stick and into the center of the pumpkin, leaning to a side. 


4.  Starting from your biggest flowers start filling in.  Continue with medium  and then the smallest flowers to hide the foam.  I started with sunflowers, followed with the roses and the gerber daisies.  Next I added some berries and finished off with mums.  And you are done!  I hope you enjoyed this DIY project and give it a try.  I wish you and your home heartwarming get-togethers this Thanksgiving!  Blessings unto you.